Git အကြောင်း
Git is a version control system.
Git helps you keep track of code changes.
Git is used to collaborate on code.
Git ဆိုတာဘာလဲ
Git ဆိုသည်မှာ version control system တစ်ခုဖြစ်ပါတယ်။ ၄င်းကို ၂၀၀၅ ခုနှစ်မှာ Linus Torvalds က ဖန်တီးထားခဲ့တာဖြစ်ပြီး Junio Hamano ကဆက်လက် ပြုပြင်ထိန်းသိမ်းထားခဲ့ပါတယ်။
It is used for:
- Tracking code changes
- Tracking who made changes
- Coding collaboration
Git ၏ အဓိက ရည်ရွယ်ချက်မှာ project file များအား သိမ်းဆည်းပေးထားပြီး အပြောင်းအလဲများများ စောင့်ကြည့် မှတ်တမ်းတင်ထားနိုင်ခြင်းဖြစ်သည်။ ထိုကဲသို့ file များအားပြောင်းလဲရာတွင် မည်သူက ပြောင်းလဲခဲ့သလဲ ဘာတွေပြောင်းလဲထားခဲ့သလဲ ပြင်ဆင်ချက် history များအား စောင့်ကြည့်မှတ်တမ်းတင်ထားပြီး ထိုအပြောင်းအလဲ point များအား ပြန်လည်ရယူနိုင်ခြင်းဖြစ်သည်။ ထိုအပြင် အဖွဲလိုက် Team အလိုက် project တစ်ခုကို အတူတကွ လုပ်ဆောင်နိုင်ပြီး ထိုကဲ့သို့ တစ်ဦးတစ်ယောက်စီလုပ်ဆောင်ချက်များအား ပြန်လည်ပေါင်းစည်းပေးနိုင်သည်။
What does Git do?
- Manage projects with Repositories
- Clone a project to work on a local copy
- Control and track changes with Staging and Committing
- Branch and Merge to allow for work on different parts and versions of a project
- Pull the latest version of the project to a local copy
- Push local updates to the main project
- Repositories ဟုခေါ်သော projects များအား အား စီမံခန့်ခွဲခြင်း။
- Clone ဟုခေါ်သော git repositories မှ projects များအား ပြင်ဆင်နိုင်ရန် မိမိ၏ local repositories (laptop/ desktop pc) တွင်းသို့ download လုပ်သိမ်းဆည်းခြင်း။
- ပြင်ဆင်ထားသော project/ file အား Staging ဟုခေါ်သော git local repositories တွင် add ခြင်း နှင်း အပြောင်းအလဲများအား ပင်မ project/file သို့ commit လုပ်ခြင်း။
- ထပ်မံ၍ စမ်းသပ်ခြင်း ပြင်ဆင်ခြင်းများ လုပ်ဆောင်နိုင်ရန် မူလ orginal project/file မှ copy ပွားခွဲထုတ်ခြင်းကို branch ခွဲခြင်းကို ခေါ်ဆိုပြီး ပြင်ဆင်ပြီးပါက ထိုစမ်းသပ်ခြင်း ပြင်ဆင်ခြင်း ပြုလုပ်ထားသော branch အား original project/file (master/main branch) ပြန်လည်ပေါင်းစည်းရန် merge လုပ်၍ ပြန်လည်ပေါင်းစည်းခြင်း။
- မိမိ၏ laptop/pc တွင် မိမိ စိတ်ကြိုက် အသစ်ဖန်တီးခြင်း ပြင်ဆင်ခြင်း ပြုလုပ်ထားသော project အား local Git repositories တွင် staging(add) ခြင်း၊ commit ခြင်းများ ပြုလုပ်ပြီးသော အခါတွင် Git Cloud Repositories တွင် upload (Push) လုပ်ပေးရခြင်း။
- Git Cloud Repositories တွင် တင်ထားပြီးသား projects များအား မိမိ laptop/pc အတွင်းသို့ download (Pull) လုပ်ခြင်း။
Git နှင့် အလုပ်လုပ်ခြင်း
- Initialize Git on a folder, making it a Repository
- Git now creates a hidden folder to keep track of changes in that folder
- When a file is changed, added or deleted, it is considered modified
- You select the modified files you want to Stage
- The Staged files are Committed, which prompts Git to store a permanent snapshot of the files
- Git allows you to see the full history of every commit.
- You can revert back to any previous commit.
- Git does not store a separate copy of every file in every commit, but keeps track of changes made in each commit!
- Folder တစ်ခုအား Git Local Repository တစ်ခု အဖြစ်တည်ဆောက်ခြင်း။
-
Why Git?
- Over 70% of developers use Git!
- Developers can work together from anywhere in the world.
- Developers can see the full history of the project.
- Developers can revert to earlier versions of a project.
What is GitHub?
- Git is not the same as GitHub.
- GitHub makes tools that use Git.
- GitHub is the largest host of source code in the world, and has been owned by Microsoft since 2018.
- In this tutorial, we will focus on using Git with GitHub.
Git Getting Started
Git Install
Git install ပြုလုပ်ရန် website: https://www.git-scm.com/ ဒီ website တွင် download လုပ်ရယူနိုင်သည်။
Git Command Line အသုံးပြုခြင်း
To start using Git, we are first going to open up our Command shell.
Git အသုံးပြုရန် အရင်ဆုံး command prompt/shell /terminal အား ဖွင့်ပါ။
For Windows, you can use Git bash, which comes included in Git for Windows. For Mac and Linux you can use the built-in terminal.
Windows အတွက် Git bash အား download လုပ် install ပြုလုပ် အသုံး ပြုနိုင်ပြီး၊ Mac နှင့် Linux များမှာ build-in ပါဝင်သော terminal ဖြင့် အသုံးပြုနိုင်သည်။
The first thing we need to do, is to check if Git is properly installed:
အရင်ဦးစွာ Git install လုပ်ထားခြင်း ရှိမရှိအား အောက်ပါ command ဖြင့် စစ်ဆေးပါ။
git --version
Git Configure ပြုလုပ်ခြင်း
Now let Git know who you are. This is important for version control systems, as each Git commit uses this information:
Version Control System တွင် commit ပြုလုပ်ထားသည့် အချက်အလက်များဟာ အလွန်အရေးကြီးပါတယ်။ ဒါကြောင့် စတင် အသုံးပြုစဥ်ကပင် မိမိ name နှင့် account အား Git တွင် register ပြုလုပ်ထည့်သွင်းထားရန်လိုအပ်သည်။
Example
git config --global user.name "w3schools-test"
git config --global user.email "test@w3schools.com"
Change the user name and e-mail address to your own. You will probably also want to use this when registering to GitHub later on.
GitHub Flow အသုံးပြုပြီး အလုပ်လုပ်ခြင်း
GitHub Flow သည် Git နှင့် GitHub များ ကောင်းကောင်း အလုပ်လုပ်ရန် design ထုတ်ထားသော workflow တစ်ခုဖြစ်သည်။ ၄င်းသည် branch ခွဲခြင်းနှင့် ထိုခွဲထားသော branch အား team မှ လွတ်လွတ်လပ်လပ် စမ်းသပ်နိုင်ရန်နှင့် deployments အား ပုံမှန်လုပ်နိုင်စေရန် အဓိကထား သည်။
GitHub flow သည် အောက်ပါအချက်များအတိုင်း အလုပ်လုပ်သည်။
- Branch အသစ်တစ်ခု ဖန်တီးခြင်း (Create a new Branch)
- Code အပြောင်းအလဲများအား commit လုပ်ခြင်း (Make changes and add commits)
- Pull request တစ်ခု ဖွင့်လှစ်ခြင်း (Open a pull request)
- သုံးသပ်ခြင်း (Review)
- Deploy ပြုလုပ်ခြင်း (Deploy)
- ပေါင်းစည်းခြင်း (Merge)
Branch အသစ်တစ်ခု ဖန်တီးခြင်း (Create a new Branch)
Branch ခွဲခြင်း (Branching) ဟာ git ရဲ့ အဓိက လုပ်ဆောင်ချက်(concept) တစ်ခု ဖြစ်ပြီး ၄င်းသည် master branch ဟာ အမြဲ deploy လုပ်ရန် အသင့်ဖြစ်နိုင်သည်ဆိုသည့် rule အပါ် အခြေခံထားသည်။
အကယ်၍များ သင်ဟာ သင်၏ project မှာ အသစ်တစ်ခုခုကို စမ်းသပ်ချင်လျှင် Branch အသစ်တစ်ခုကို ဖန်တီးလိုက်ပါ။ Branch အသစ်ခွဲလိုက်ခြင်းဟာ သင့်ကို main branch (project) အား မထိခိုက်စေဘဲ စိတ်ကြိုက်ပြောင်းလဲ စမ်သပ်လို့ရတဲ့ ပုံစံတူ အသစ်တစ်ခုဖန်တီးပေးပါလိမ့်မယ််။
သင့်ရဲ့ branch အသစ်မှာစမ်းသပ်မှုက အသင့်ဖြစ်သောအခါ၊ ၎င်းကို ပြန်လည်သုံးသပ်ပြီး၊ ဆွေးနွေးပြီး အဆင်သင့် ဖြစ်သောအခါ master branch မှာ ပေါင်းစည်းပေးနိုင်ပါတယ်။
မှတ်ချက်။ သင်ဟာ အခြားသူများနှင့်အတူ အလုပ်လုပ်ရတဲ့ အခါ၊ branch ခွဲခြင်းအတွက် အဓိပ္ပါယ်ရှိသော ဖော်ပြချက်ရှိသော နာမည်များကိုသာ ပေးပါ၊ အဲ့ဒါမှ လူတိုင်းဟာ သင်ဘာအတွက် branch ခွဲခဲ့လဲဆိုတဲ့ ရည်ရွယ်ချက်ကို ရှင်းရှင်းလင်းလင်းနားလည်စေမှာဖြစ်ပါတယ်။
Code အပြောင်းအလဲများအား commit လုပ်ခြင်း (Make changes and add commits)
branch အသစ်အား create လုပ်ပြီးလျှင် အပြောင်းအလဲများအား ထပ်ထည့်ခြင်း(adding)၊ ပြင်ဆင်ခြင်း၊ ဖိုင်များဖျက်ခြင်းများလုပ်နိုင်သည်။ သင်ဟာ သေးငယ်တဲ့ အပြောင်းအလဲတစ်ခုအား ဖြစ်လုပ်ပြီးသည့် အခါတိုင်း၊ သင်၏ branch အတွင်းသို့ commit လုပ်ခြင်းဖြင့် ပေါင်းထည့်ပေးပါ။
Commit လုပ်ခြင်းဟာ သင်၏ အပြောင်းအလဲများ အတွက် မှတ်သားထားပေးနိုင်ပြီး၊ အပြောင်းအလဲတိုင်းအား ဘာကြောင့်ပြောင်းလဲ ခဲ့ရလဲဆိုသည့် ရှင်းပြချက်ကို သင့်အနေဖြင့် မဖြစ်မနေ မှတ်ချက်များအနေဖြင့် မှတ်သားပေးသင့်သည်။ သို့မှသာ branch ၏ ပြောင်းလဲထားသော history အစိတ်အပိုင်းမှတ်တမ်းများ အနေ့ဖြင့် ကျန်ရှိမည်ဖြစ်ပြီး လိုအပ်ပါက သင့်အနေဖြင့် ပြောင်းလဲထားသော point များအား ပြန်လည်သွားနိုင်မည်ဖြစ်သည်။
မှတ်ချက်။ commit message ဟာ အလွန်အရေးကြီးပါသည်၊ ဒါမှသာ ဘာကြောင့်ပြောင်းလဲခဲ့လဲဆိုတာကို လူတိုင်းသိရှိနားလည်နိုင်မည်ဖြစ်သည်။ Messages နှင့် comments များဟာ သင်နှင့် သင်၏ အခြား အသင်းဖော်များ အတွက် ပြောင်းလဲခြင်းများအား နောက်ကြောင်းလိုက်ရန် လွယ်ကူစေပါသည်။
Pull request တစ်ခု ဖွင့်လှစ်ခြင်း (Open a pull request)
Pull requests ဟာလည်း GitHub ရဲ့ အဓိက အစိတ်အပိုင်းဖြစ်သည်။ Pull Request ဟာ လူတွေကို သင်ရဲ့ အပြောင်းအလဲဟာ အဆင်သင့်ဖြစ်ရဲ့လား ဆုံးဖြတ်စေခြင်းနှင့် သုံးသပ်ခြင်များ ပြုလုပ်စေရန် သတိပေးပါသည်။
သင်ဟာ အခြားလူတွေအား သင့်ရဲ့ အပြောင်းအလဲများနဲ့ pull လုပ်၍ ပေါင်းစည်းခြင်းမျာကို သူတို့ရဲ့ branch ထဲသို့ ပေါင်းထည့်ရန်(merge) ပြန်လည်သုံးသပ်လားဆိုတာကို မေးမြန်းနိုင်သည်။
သုံးသပ်ခြင်း (Review)
Pull request တစ်ခုအား ပြုလုပ်သောအခါ၊ ၄င်းသည် ဘယ်သူက proper access ရှိသလဲဆိုတာကို သုံးသပ်ကြည့်ရှုနိုင်ပြီး ၄င်း အပြောင်းအလဲအတွက် သင့်တော်ကောင်းမွန်တဲ့ သုံးသပ်ချက်၊ ဆွေးနွေးချက်များ ရှိခဲ့လားဆိုတာကို သိနိုင်သည်။
Pull Request ဟာ လူတွေ လွယ်လွယ်ကူကူနဲ့ ပိုကောင်းမွန်တဲ့ result တွေကို အတူတကွ လုပ်ဆောင်နိုင်ရန်အတွ်က design လုပ်ထားခြင်းဖြစ်သည်။
အကယ်၍များ သင် feedback ပြန်ရပြီး အပြောင်းအလဲအား ရှေ့ဆက်တိုးတက်ရန် new commit ဖြင့် အပြောင်းအလဲများအား push လုပ်နိုင်သည်၊ ဖြစ်နိုင်ရင် သေချာ (review) သုံးသပ်စေချင်သည်။
မှတ်ချက်။ Note: GitHub shows new commit and feedback in the "unified Pull Request view".
Deploy ပြုလုပ်ခြင်း (Deploy)
Pull Request အား ပြန်လည်သုံးသပ်ပြီး အားလုံး အဆင်ပြေပါက အဲ့ဒါဟာ testing လုပ်ရမဲ့အချိန်ပဲ ဖြစ်ပါတယ်။ GitHub ဟာ production မှာ final testing အတွက် main branch သို့ မပေါင်းခင် branch မှ deploy လုပ်ဖို့ ခွင့်ပြုထားပါတယ်။
အကယ်၍ ပြဿနာ ပေါ်ခဲ့ပါက၊ production အား master branch မှ အပြောင်းအလဲအား ပြန်လည် deploy လုပ်ခြင်းဖြင့် undo လုပ်နိုင်သည်။
မှတ်ချက်။ Teams တွေဟာ branch တွေ deploy လုပ်ရန်အတွက် သီးခြား testing environments များထားရှိတတ်ကြသည်။
ပေါင်းစည်းခြင်း (Merge)
သေချာစေ့စေ့စပ်စပ် စမ်းသပ်ပြီးနောက်၊ သင့်ရဲ့ code များကို master branch သို့ ပေါင်းစပ်(merge) လုပ်နိုင်ပါသည်။
Pull Requests ဟာသင့် code ရဲ့ changes records များကို မှတ်သားထားပေးသည်၊ အကယ်၍ သင်ဟာ comment နဲ့ ပြောင်းလဲခဲ့တဲ့ name များကို ကောင်းစွာပေးထားခဲ့လျှင် ဘာကြောင့် change ခဲ့တာလဲဆိုတာနဲ့ ဘယ်လိုတွေဆုံးဖြတ်ခဲ့ကြတယ်ဆိုတာကို သိရှိနားလည်နိုင်ပြီး လိုအပ်ပါက ထိုအခြေအနေများသို့ ပြန်လည်သွားနိုင်သည်။
မှတ်ချက်။ သင့်ရဲ့ pull request များအား လွယ်ကူစွာရှာဖွေနိုင်ရန် keyword များအား add လုပ်ထားနိုင်သည်။
Git GitHub Pages
Host Your Page on GitHub
GitHub ရဲ့ pages များနှင့် GitHub ဟာ သင်ရဲ့ repository မှ webpage တစ်ခု host လုပ်နိုင်ရန်ခွင့်ပြုထားသည်။ GitHub Pages အားအသုံးပြုပြီး ကျွန်ုပ်တို့ရဲ့ repository များကို host လုပ်ရန် try ကြည့်ကြပါမယ်။
Create a New Repository
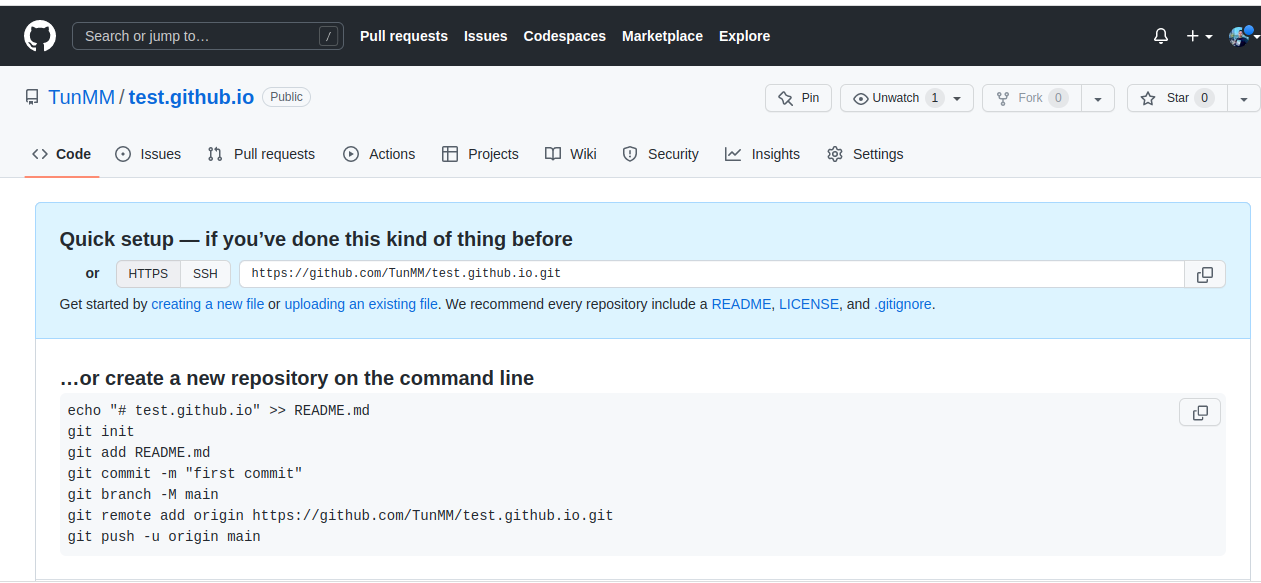
ရှေးဦးစွာ GitHub တွင် login ဝင်ပါ၊ GitHub Pages အလုပ်လုပ်ရန် special name နှင့် setup ပြုလုပ်ပေးရန် လိုအပ်သည်၊ အရင်ဆုံး new repository တစ်ခု အရင် create လုပ်ပါ။
Push Local Repository to GitHub Pages
Local repository အား remote လုပ်ရန် create လုပ်ထားသော new repository တွင် add ပါ၊ အဲ့ဒါကို gh -page(for GitHub Pages) လိုခေါ်ပါတယ်။
ပုံမှာပြထားသောနေရာတွင် URL အား copy လုပ်ပါ။
ထိုနောက် new remote လုပ်ရန် add ပါ။
git remote add gh-page https://github.com/TunMM/test.github.io.git
w3schools.com မှ မှီငြမ်းထားသည်။
We'll coming soon...

No comments:
Post a Comment